The BIC Mapping Designer is installed locally on your machine. The repository which contains all mappings for the staging and the production environment is located in the iPaaS system. To start working, you need to connect the BIC Mapping Designer and the iPaaS system via a URL.
|
Information: If you have not worked with the BIC Mapping Designer before, we strongly recommend to take one of our training courses: Business Integration Converter 6 Basics, Business Integration Converter 6 Advanced and SEEXML. |
Note: For the connection, it is necessary to open the right port within the VPN tunnel between your company network and the SEEBURGER datacenter. That means you need to set up the VPN connection first. |
To connect the BIC Mapping Designer to the iPaaS system, follow these steps:
Open the BIC Mapping Designer.
Make a right click on the Default folder to open the context menu.
Click New > Project.
Give the folder a proper name if needed.
Make a right click on the Default folder to open the context menu.
Click Repository > Manage Repository Connections.
Click Add.
In the field Host, enter the server name or the IP address you have set up to reach the iPaaS system.
In the field Port, enter 10000 for http, and 8443 for https.
Click OK.
In the login dialog, enter your User name and Password or your Access Token.
Click Login.
UMS users can log in to the BIS Portal directly using their login credentials.
Note: To log in to the BIS system, you can use the same login credentials as for the BIS Portal. |
In the login dialog, in the tab Password, enter your User Name and Password.
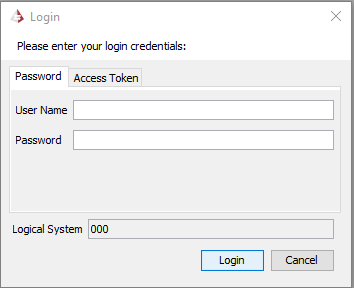
Click Login.
Note: We recommend to test your mappings within the BIC Mapping Designer before checking the mapping in to the repository. |
SAML users can access the BIS Portal after logging in to their company account.
Note: To log in to the BIS system, you need to generate and use an access token. |
In the BIS Portal, open your user settings in the upper right corner.

Open the tab Access Token.
Click New.
Enter a Description for the token.
Click Generate Access Token.
Click Copy and Close.
Click Save.
In the login dialog of the BIC Mapping Designer, open the tab Access Token.
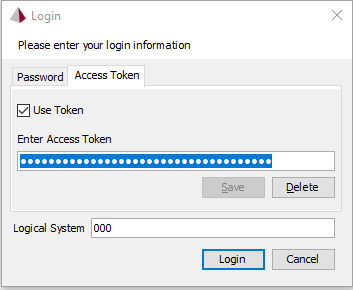
Paste your access token into the field Enter Access Token.
Click Save.
Click Login.
Note: We recommend to test your mappings within the BIC Mapping Designer before checking the mapping in to the repository. |


