|
Note: The classic BIS Front End will no longer be supported with software version SP 158 from July 2024. The BIS Web Front End will replace the classic BIS Front End: |
Note: It is not recommended to use the same download for different BIS versions because of the strict version requirements. Please use different extraction folders for each target. Also, for different BIS systems you will typically have different BIS front-end installers. |
Note: For the log-in to the BIS Portal, it is necessary to open the right port within the VPN connection. That means you need to set up the VPN connection first. |
To integrate the BIS Front End via the stand-alone installer, follow these steps:
Log in to the BIS Portal on both environments, staging and production.
Open the app BIS Front-end Download to download the start script for the BIS Front End.
Click the download link for your system:
Use a ZIP tool to extract the archive into a new and empty folder.
Execute the start script to start the BIS Front End:
UMS users can log in to the BIS Portal directly using their login credentials.
Note: To log in to the BIS Front End, you can use the same login credentials as for the BIS Portal. |
In the login dialog, in the tab Passwort, enter your User name and Password.
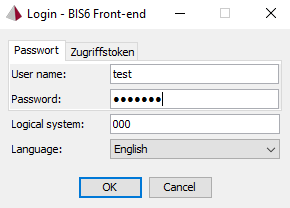
Enter a Logical system.
Select the Language you want to use.
Click OK.
Note: In case of unexpected issues while starting the BIS Front End, download the stand-alone installer again and extract it in a new directory. |
Find more information here:
SAML users can access the BIS Portal after logging in to their company account.
Note: To log in to the BIS Front End, you need to generate and use an access token. |
In the BIS Portal, open your user settings in the upper right corner.

Open the tab Access Token.
Click New.
Enter a Description for the token.
Click Generate Access Token.
Click Copy and Close.
Click Save.
In the login dialog of the BIS Front End, open the tab Zugriffstoken.
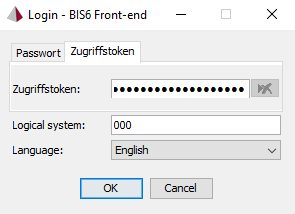
Paste your access token into the field Zugriffstoken.
Click OK.
Note: In case of unexpected issues while starting the BIS Front End, download the stand-alone installer again and extract it in a new directory. |
Find more information here:


